These Beauty Products Went to the Head of the Class in 2014

urban decay, makeup setting spray, beauty blender, smashbox, under eye concealer, artistry, dove, hair spray, best beauty products from 2014

Between subscription beauty boxes and new beauty technology, it seems that the beauty product world is taking great strides to make things easier for us all. Pretty soon we’ll be doing the Jane Jetson thing – walk into our closet and a few puff of makeup-laden clouds later, emerge ready to take on the day!
I’m excited to see what 2015 is going to bring, but I’m also very happy to take my favorite products from 2014 into the new year.

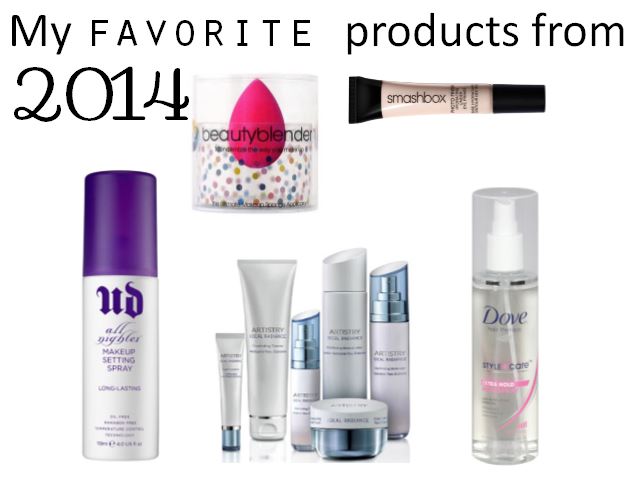
Here are my top five favorite beauty product picks from 2014…

Dove Hair Spray
I have tried so many different brands and holds, but this Dove extra hold hair spray that you can pick up at any grocery store, has become my absolute favorite. When I spray it on while I’m styling then again afterwards, I can wake up the next day with the same hair. It also doesn’t crunch up and leaves my hair shiny

Beauty Blender

This little sponge doesn’t look amazing, but once you try it you’ll believe. If you get it a little damp, it expands to twice it size and becomes the absolute best way to apply concealer or really any kind of foundation to your face. It gets right in there and leaves your makeup so smooth.

Artistry Moisturizer and Spot Corrector
This was the year I really decided to spend a little extra on my skin. Because it’s something you’re wearing always so why not invest a little more in it. Their spot corrector actually works, and this moisturizer does a great job of brightening your skin overall. Contact this gal to get you some!

Smashbox Photo Finish Hydrating Under Eye Primer
This is a primer that goes under your concealer. It automatically brightens your under eye area just by itself, and it helps your concealer stay put. I just started using this and I’m impressed by it. You can pick it up at Sephora or Dillard’s.

Urban Decay Makeup Setting Spray
I am addicted to this stuff. It just provides the perfect pick-me-up mist in the middle of the day and really helps set my makeup. On the days I use it I can tell a difference on my face. My makeup doesn’t look so tired. And if you get the big bottle it will last you a long time. This one has lasted me a full year.

Continue Reading

Easy Glamorous Eyes for the Non-Makeup Enthusiast

Tonight is the annual Christmas party for the company I work for. It’s completely my brain child. One that I birthed, reared and have to clean up after.

So I’m going to try and make things as easy as I can on myself tomorrow. Starting with my makeup.

I’m going to demonstrate the look on my model, Dina, here. Thanks Dina!

makeup, how to do smokey eyes, smokey eyes, eye shadow, easy party makeup look, makeup, party makeup, eye shadow

Start with a festive shadow. My favorite for this is gold because it really brings out the warmth of my brown eyes. And I think the flecks I have going on in there are gold. The mirror is way too far away for me to confirm that, and let’s face it, you probably don’t even care.

Look at what color the flecks in your eyes are and find a shadow that mimics it.

Apply that all over your lid (lightly) and put a little under your eyes. Ninety percent of the time I apply shadow below my eye as well because I like how it makes them look bigger, but you don’t have to if you don’t want to. What I’ll do next is add a little more shadow near my lash line. I always start with a light layer because, much like salt, it’s a lot easier to add more than it is to take it away. I usually do go back and fill it in a little more on my lid, though.

Next, get your eye liner. Take a black eye pencil (you do need an eye pencil for this – not any other liner) and run it over your lid, making it kind of thick. It doesn’t have to be perfect because you’re going to smudge it. Ok, now smudge it. Get it there and mess it up! Ok stop.

Now take the pencil and run it really close to your lash line this time. I like a little definition at my lashes to help them look fuller. This line you do want to be a bit more perfect, but if you mess up, it’s ok. Just smudge it again with your finger.

What this creates is kind of a gradient from black to whatever shadow you’ve gone with. Aka: an awesome party look!

Continue Reading

3 Steps to a Clean Makeup Drawer

makeup drawer

A strong advantage to writing a blog about cleaning out your makeup drawer, is that you have to actually clean out the makeup drawer. There’s no excuse.

Good news is it took less than 20 minutes. So whether you have a makeup drawer, bag, box, or crate, it can be easily cleaned in three steps.

makeup drawerStart by pulling out everything. This will help you see what all you’ve got hiding in the corners. In doing this I found bronzers I haven’t touched in over a year, a primer I was hanging onto even though it made me break out, and an unmarked jar of something…I still don’t know what it is.

makeup drawerNow that you’ve got everything out, go ahead and arrange it all into categories (i.e.: eyes, lips, face). This will help you see what you need, what you have duplicates of, and what’s really been so used up it needs to go.

makeup drawerYou may not have a makeup drawer, you may have a makeup bag. Whatever you store it all in clean out that container. If you’re like me and you use a silverware divider wash it with soap and water. I found this to be much more effective over a spray cleaner because the water loosens the dirt more easily. If it’s a bag, run it through the washer. Either way, don’t skip this step because it’s going to make everything look/feel/be so fresh afterwards.

makeup drawerIt’s time to put your makeup back in your clean container! Now that you’ve cleared out the clutter, streamlined your categories and cleaned out your container, you can put it all back together to make one good looking makeup drawer (I even like to wipe everything down before I put it back).

It’s a quick easy clean that’s going to have you feeling very good about yourself tomorrow morning!

Continue Reading

Concealer That Works and How to Apply it Correctly

concealer jpg

Sometimes I read beauty product descriptions just to feel good.

Really, those people know how to make the simplest product sound so hopeful, like after you buy this shampoo…nothing will ever be a problem for you, ever. I try to steer clear of the pie in the sky kind of hopefulness when I write a product review. I want you to know the truth about how something works and whether it’s worth your time and money.

So here it goes, for MAC Concealer…

Using this concealer will cause every skin flaw to melt away and nothing will ever be a problem for you…just kidding.

I started using Pro Longwear Concealer by MAC several months ago, after hearing another beauty blogger rave about it in a video. She said she had tried many concealers, but none worked as well for under her eyes as this one. Hearing this I realized I had this same product sitting unused in my makeup drawer.

So I put it to good use, and it turns out she was right. This concealer is best used for under-eye concealing as it doesn’t settle in the little lines around your eyes as badly as some can. I also like to dab some at the corners of my nose. Most women don’t think about putting concealer there, but it’s good to do so as it can get easily red from hormones or being touched throughout the day.

Let me make a note here about how to apply concealer under your eyes. Remember that skin is very delicate (as in tissue paper delicate), so you want to apply any product in that area with your ring finger. That one is generally the weakest of all five (unless you’re into ring finger weight-lifting) and will do the gentlest job of applying any product.

With this concealer specifically, you’ll want to pump it once onto the tip of your finger and apply from there. The bonus to using your fingers for this job as opposed to a brush, is that it will warm up the concealer and get it to melt in more quickly.

It’s truly “longwear” and works wonderfully. You can click here to read more about it from the MAC website, after that you’ll probably understand why I like to read beauty product descriptions for fun!

Continue Reading

All the Makeup You Need to Pack

makeup you need to pack

Four words I’ve never heard anyone say, “I really enjoy packing.”

That’s because no one enjoys whittling down their possessions to what they “think” they’ll need while away from home, and cramming it all in the tiny space of a suitcase. But if that’s the most amount of work I have to do for a few days of relaxation, I’ll suck it up.

Here I showed you four dresses that could get you glamorously through a weekend away. Today I’m going to show you that all you need to pack in your makeup bag are these six items…

makeup you need to pack

1. CC Cream – Give your foundation a break and let your skin breathe a bit by just packing a high powered cream. Most versions give you great coverage, evens your skin tone and moisturizes. So don’t fight me on this, just pack it.

2. Maybelline Color Tattoo in “Bad to the Bronze” – This eye shadow is basically what my lids live in during the summer. It’s got the right amount of shimmer, goes great with a tan, doesn’t crease, and can be layered up for a more dramatic effect. It’s the black t-shirt of your makeup bag.

3. MAC Black Eyeshadow in “Carbon” – When you’re packing lightly you need products that can pull double duty. This can be layered on as an eyeliner during the day, and can live inside your water line for a smokey eye at night. It’s totally awesome like that.

4. MAC Small Angled Brush #266 – I use this brush only… everyday. It’s the best for filling in my brows and creating the perfect cat eye. It’s also great for getting liner and shadow right there where your lashes meet your lid, giving you a fuller lash effect. Sounds like this little guy wins a ride on the vacay-bus!

5. L’Oreal Mascara – Even though you’re on vacation, people are still going to need to see your lashes! Remember mascara, forget the lash curler. It takes up room and you can give it a rest (unless you’re one of those weirdos that loves curling lashes).

6. Maybelline Dream Bouncy Blush – Saying the name is a vacation in and of itself! The great thing about this blush is you can apply it with two fingers, which means you can leave your blush brush at home with a bag of potato chips and the Netflix password.

Continue Reading