A Quick and Easy Smokey Eye with Gold and Taupe

Just because it’s called a “smokey eye” doesn’t mean it has to look like smoke.

Today I want to show you how I played around with gold and taupe to create a great sultry look  (and just for a quick resume, I’ve been taught by MAC professionals :)

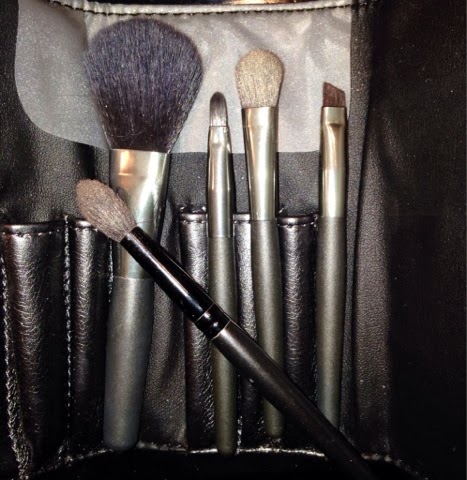
Here are the colors I used and their corresponding brushes…

How to create smokey eyes with gold and taupe, up on the blog!

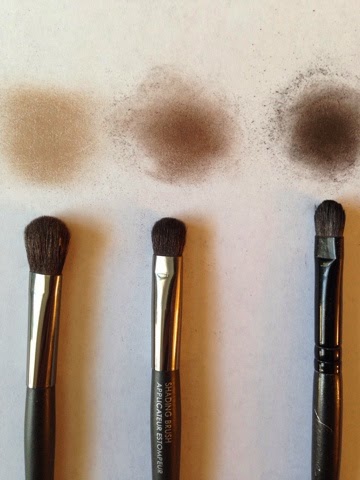
It’s very very very (very x infinity) important that you have the right kind of tools when applying makeup. The right brushes will take your techniques from novice to professional looking in seconds. So make sure you’ve got good ones (more blogs on that coming soon).

This is my model, Petunia, she's helping me demonstrate how to do a smokey eye :)
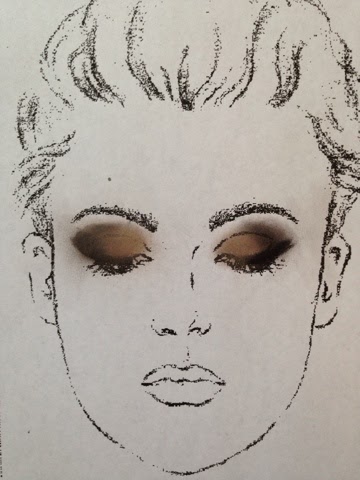
The left is blended, the right is more defined. Learn how to do them both!

Step 1:

Cover your whole lid with a very light gold. To do this, you’ll need a wide brush. You want you’re entire lid covered in this color so a brush that gets everywhere is perfect (like this one).

Step 2:

Take a slightly smaller brush and use a darker matte shade of taupe. You really want to stay away from doing smokey eyes with three shades that all sparkle. It’s best to mix texture and color when it comes to doing a smokey eye, but if all you have is all matte or all sparkly eye shadows, that’s fine. Just remember in the future to mix it up when you buy new ones.

(Here’s a link to a great brush starter kit!)

Step 3:

For this step you’ll need your smallest, tightest brush (here’s a good one). Because what you’re going to do is use the darkest shadow you’ve got and make a W shape starting at your lash line, going up slightly into your crease, and then bringing it down below your lower lashes (it’s a funky looking W, but you get my drift). You don’t have to go below your lower lashes, but I like to because it makes my eyes look bigger.

Step 4:

Now at this point you’ll want to blend with that smaller brush you just used for the dark shadow. Really try to work that shadow in so the lines are blurred (sing it: Blurred lines!)

Step 5:

As you can see on my lovely model (her name is Petunia, by the way) I blended her left eye, but not the right. So there are two directions you can go at this point. You can…

A. Take that first brush (the big wide one) and go over the whole lid making sure all the colors blend together perfectly.

B. Take that first brush, dip it back in that gold color to retouch the lightest shade and leave it at that.

It’s up to you, and how good your work looks after step 4.

Step 6:

Finally, I like to add a defined cat eye to complete the whole look. I really feel like it helps amplify your lashes, and perfectly punctuates the whole thing. Again, you can do it more defined, or you can blend it in with the brush you used to add the darkest color.

As you can see on the right eye, I let the end of the cat-eye line a little thicker. Don’t feel like it has to be perfect when you’re adding it to a smokey eye, because it’s not as visible.

Petunia was a little squirmy, but if you want to print out and practice on her before you do your own face, you can find the same picture here (but be warned, she complains a lot ;)

I really hope this helps! If you have any questions about this, or other makeup application techniques, feel free to email me elizabeth@thespiff, or of course you can reach me through Facebook, Twitter, Instagram, and now Pinterest!!

Get your toes ready for the warmer temperatures next week, check out these great shoes and toe nail polish pairings!

Have a very Spiffy weekend! :)

Continue Reading

4 Steps to a Cleaner Makeup Bag

It’s good to clean out your makeup for the same reason it’s good to clean out anything: it makes you feel so good afterwards!

When you go to apply things to your face, you want those things to look fresh and clean and neat, not dirty and gross. Take a few minutes to follow these steps and I promise it’ll make you feel so good!

1. Take all your makeup and organize it by: eyes, lips, cheeks, skin.

Right off the bat this will allow you to see what you have multiples of. Sometimes you can buy the same shade of something and not even realize it.

Find any multiples? Toss the oldest one or if nothing is really old, start a smaller bag that you can take on the go.

2. Eliminate by date.

Believe it or not, makeup can expire. And even though you paid $60 for a product that’s not finished, if you bought it 3 years ago it’s probably not doing you any good.

At this part in the process, toss anything that doesn’t smell or look right.

Powders like eye shadows, blushes and bronzers have the longest shelf life. If you still want to test one, first smell it and make sure it doesn’t smell like chemicals, rub your finger over it make sure it’s got a silky texture, then check the color and make sure it looks opaque on your finger. Finally, rub it on the back of your hand to ensure it can still blend.

Here’s a quick break down of the lifespan of each category:

Toss any brushes if they’re shedding hairs. You don’t want those all over your face!
Also get rid of anything you haven’t used in 6 months. Products that you dip your fingers into, or ones that goes around/in your eyes can build up bacteria if you’re not careful.

3. Pull out the essentials.

For brushes you’ll need 2 medium-large brushes for bronzer and blush. You’ll need a narrow angled brush (it’s my go-to cat eye tool), a smudge brush, a wider shadow brush for all over color, and a medium tapered brush for contouring. 

For lips you’ll need a sheer shimmer, lipstick (without shimmer), clear gloss and lip liner. These will help you to mix and match for a range of looks from simple to dramatic.
If you’ll first pull out the essential items, you’ll easily see what’s expendable. Go through this pile and see if there’s anything you haven’t used in a while that you can get rid of/move to a smaller bag.

4. Clean off everything.

I don’t care if you paid $1 or $100 for your makeup, clean off their packages so they look better. It doesn’t feel good to apply something that’s coming out of a container that’s all smudged and gross. 
Wipe everything down, clean off your brushes (use this) then turn your makeup bag inside out and run it through the dishwasher. This will give you that extra sense of fresh when you back only the items that you know are safe and good to use.

Start 2014 off right with a makeup bag that’s fresh and clean! (Today was supposed to be about cleaning out your jewelry box, but there was so much information about this from the show that I wanted to pass on more details…stay tuned for the jewelry box edition!)

Continue Reading

A Clean Brush is a Happy Brush

And a happy brush makes for good looking eyes.
And good looking eyes make for a happy person.
And a happy person makes for more happy people.

So really, what I’m about to tell you will benefit all of society.

You’re welcome :)

If there’s one thing we should all realize in this germ-conscious world we live in, it’s that when we put something near our eye on a regular basis it aught to be clean.

And this brings me to reason number 4,335,725 why Sephora is so wonderful.  Inside their candyland-for-women-walls rests brush cleaner (which can be found on the brush wall) that is cheap, disinfecting, and overall simply wonderful.

It’s only 10 dollars and will last you at least 3 months depending on how often you clean.  But it’s wonderful! Especially if you’re a multicolor eye-shadow person like me-self.

The only hitch I have found in this program is that you MUST look very carefully at the bottle’s label as there is a spray, or “daily cleanser” (that’s pictured, and that you can use for a quick clean) and a shampoo (that should be done with time to let your brushes dry, say, overnight).  I was a habitual user of the spray till I accidentally bought the shampoo and also fell in love with it.  It completely resets my brushes so that they are color free (no bleeding the purples and the greens for a poopy color) and ready to go directly in my EYE without any hesitation…

…Which I do when I’m applying eye liner to my water line. For that I HAVE to have this stuff because I don’t want sparkles or grossness entering the inside of my eyeball.

Ideally it would be nice to have both because the spray is so great for a quick clean, but that’s not a problem with them being on 10 bucks!

Now go out and prepare to celebrate all the happy, talented people you know that were born on this week :)

Continue Reading